


Tool Wrap is a Stainless Steel .002" thick foil that is often used by tool & die makers, mold makers, machinists, and various maintenance personnel for wrapping tooling components in order to protect them from decarburization (or scaling) during the heat-treating process. Watch Kurt Repsher demonstrate the correct way to use tool wrap in this exclusive video.
Tool Wrap Basics
Why is it used?
Use stainless steel Tool Wrap for tool steels that are air hardened. This heat-treating process is ideal when a controlled vacuum furnace is not available. It also saves time and expense by allowing the hardening process to be done in-house rather than having to send parts out for treatment.
How is Tool Wrap used?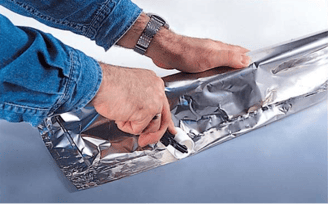
- Select type based on heat treatment temperature: Type 321 Stainless Steel is used in temperatures up to 2000° F. Type 309 Stainless Steel will work in temperatures up to 2240° F.
- Cut to size: Tool Wrap is made out of a material that can easily and quickly be cut with snips or heavy scissors.
- Clean the tool surface: Any oil or residue left on the metal surface of the workpiece to be heat-treated should be cleaned off first.
- Wrap the tool: Place the tool the folded Tool Wrap envelope, then carefully seal the open ends by folding and creasing it with a Crimper Tool at least twice.
- Seal it tight: Remove as much air as reasonably possible before sealing, using a Foil Roller or Crimper Tool to help make a proper, airtight seam. The sealed Tool Wrap envelope will lock out the air, simulating the results of using a vacuum furnace. The part to be heat-treated doesn’t have to fit tightly in the Tool Wrap, but the envelope enclosing it should be as airtight as possible in order to prevent excess oxygen from entering, as that can cause pitting and scaling on the surface of the part. At the higher temperatures required, the Tool Wrap may stick to the workpiece during hardening, which is usually caused by either wrapping that’s too tight, the supporting surface being uneven, or a foreign substance like oil or residue that remained on the workpiece surface. Sometimes even if smooth work support surfaces are used and the part is “clean” and loosely wrapped, sticking can still occur. Tech Tip: A liberally dusting the tool with aluminum oxide or magnesium oxide will fix this problem and help prevent the wrap from sticking to the tool.
When should I vent tool Wrap?
- When wrapping a large, oddly shaped part: The expansion and contraction of a well-sealed Tool Wrap envelope is normal while heating and cooling because of the sealed-in air. With an exceptionally large or unusually shaped part, the trapped-in air could strain the Tool Wrap significantly enough to pierce through the foil. Most likely to occur during its cooling process, this isn’t usually a serious concern, and it can be eliminated completely, by venting the envelope. Prepare your Tool Wrap envelope in the usual way and leave about a 1/4" opening on one corner. Ensure the vent remains open, load the envelope into the hot furnace and the entrapped air will escape through the vent as the envelope heats—thus eliminating any pressure built up during the heating cycle. As soon as the envelope becomes hot, seal the vent corner by folding it over with a pair of tongs, and then allow the envelope to remain in the furnace until the heating cycle is completed. The venting procedure also reduces any pressure that would be caused by the rapid collapse of an expanded package during cooling.
- After heat-treating, and prior to quenching: Removing the foil prior to quenching is not only difficult, but surface scaling and decarburization from exposure to the atmosphere may also occur—so the work piece doesn’t usually need to be removed from the Tool Wrap. However, the insulating effect of the Tool Wrap can sometimes make it necessary to remove it before quenching in order to obtain more rapid hardening.
Toool Wrap Tech Tips:
- Cleaning or surface preparation may or may not be required after the heat-treating process. Due to oxidation by the entrapped air, a blue or tan surface color will be apparent. This discoloration is only cosmetic, however, and it can easily be removed by buffing if desired.
- The Tool Wrap envelopes cannot be reused. The titanium content of Type 321 or 309 Stainless Steel is a characteristic that makes it ideally suited for preventing decarburization. The titanium acts as a catalyst by reacting with any oxygen within the foil before the oxygen can react with the surface carbon in the tool. After use, the titanium is somewhat depleted, thereby offering no safeguard in preventing decarburization. In addition, the foil becomes very brittle after use, preventing the wrap from forming a tight seal and also making it more prone to tears.
- Decarburization (or decarbonization) is the process that’s the opposite of carburization, and describes the reduction of carbon content in the steel. If the depleted carbon (or decarburization) of the outer surface will not reach the desired Rockwell, the steel will be left with soft skin, and tool steel fatigue usually originates in the decarburized outer layer.
- A workpiece can be double wrapped in Tool Wrap to ensure that the tool is adequately protected, and tools, dies and parts with sharp edges may also need a double wrap to avoid air exposure from tears. A slight increase in the hardening/heating times may be necessary in order to compensate for the extra Tool Wrap.
- Small parts can be bright hardened which can be accomplished by using the Tool Wrap, and for maximum brightness, the part must be thoroughly cleaned and free from oil stains before heat treatment. The piece must be securely sealed in a Tool Wrap envelope with several extra edge folds—not only to ensure that no air can enter, but also to help prevent the parts from piercing the Tool Wrap. For best results, it’s essential to transfer the envelope from the furnace to the quenching medium as quickly as possible. The Tool Wrap acts as an insulator, so it’s necessary to remove the Tool Wrap before quenching in order to obtain more rapid hardening/tempering—or just slit the envelope and allow the part to fall immediately into the quench.
