Check out this video and see Travers Tool Tech Team Expert Kurt Repsher demonstrate how to read dial calipers. Calipers are used for repeatable accuracy of inside, outside, step & depth measurements. Though not as easy to read as their digital counterparts, dial calipers display measurements very clearly and are generally regarded as easier to read than traditional Vernier calipers. As an added benefit, since analog, dial calipers are not reliant on batteries or a power source.
Be sure to subscribe to our YouTube Channel by clicking the button below, and check out many more exclusive 'How To' videos, product demos, unboxings and more!
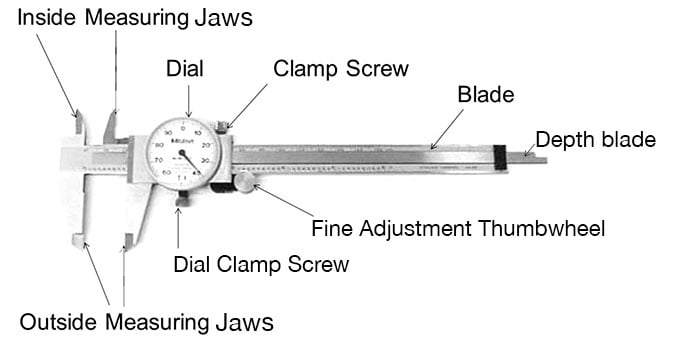
What Are The Parts Of A Dial Caliper?

What Types Of Measurements Can Be Taken With A Caliper?
There are four ways to measure using calipers:
- Outside: To take an outside measurement, slide the caliper jaws open, and place the caliper over the object to be measured. Slide the jaws until they contact the workpiece.
- Inside: To take an inside measurement, you must slide the caliper closed, and place the inside-measuring jaws (found at the top of the caliper) into the space to be measured. Slide the jaws apart as far as they can go to obtain the inside measurement.
- Depth: To measure depth, utilize the depth blade that extends out the bottom (or far end) of the caliper. Press the main bar of the caliper against the top of the hole, and then open the caliper until the depth blade hits bottom to determine the depth of the object you are measuring.
- Step: To determine the step measurement, open the caliper and place the caliper's sliding jaw on the upper step of the workpiece. Then, open the caliper until the fixed jaw contacts the lower step.
What Types Of Dial Calipers are There?
There are several different types of dial calipers:
- .100” per revolution: the most popular type by a huge margin. (see 57-015-155)
- .200” revolution: not as common, and sometimes found on 4” dial calipers. (see 57-015-150)
- Metric: not very common in the U.S., but very helpful if you work in metric measurements. (57-015-005)
- Fractional: extremely uncommon, but handy if you need calipers that read in fractions. (see 57-015-064)
Note: Some “inch” calipers include millimeters on the main scale, but since the dial is not used, it’s only a rough measurement.
how do you read Dial Calipers measurements?
First, we need to know the terminology for each space. Since calipers read three places past the decimal, the correct way to read them is what’s written in the quotations, below.
- 1.000" = “one inch”.
- 0.100" = one tenth of an inch, or “one hundred thousandths” of an inch.
- 0.010" = one hundredth of an inch, or “ten thousandths” of an inch.
- 0.001" = “one thousandth” of an inch.
- 0.0001" = one, one hundred thousandth of an inch, or one tenth of a thousandth of an inch, or simply, “one tenth”.
how do you read Dial Calipers?
Follow This Simple Four-Step Process to Reading Dial Calipers:
-
STEP 1: Read the whole inch (example: 1.000) measurement first.
Just like on any ruler, yard stick, tape measurer, etc., if it’s one inch or more, we read the whole inch (or inches) measurement first. In this example, we have one inch. -
STEP 2: Next, read the whole tenth of an inch (example: 1.200).
On the main scale of your calipers, each inch is divided into ten parts, making each one a tenth of an inch. After you read the inches, notice how many whole tenths past the inch can be seen. In this example, we have one inch and two hundred thousandths. -
STEP 3: Now read the hundredths (example: 1.230). The needle makes one full revolution around the dial for each tenth of an inch. The dial has 100 equally spaced lines, and every tenth line has a two-digit number (eg.: 10, 20, 30, etc.) Read the last number that the needle goes past. Our example above is one inch and two hundred, thirty thousandths.
-
STEP 4: Finally, read the thousandths (example: 1.234). Count the number of lines between the needle and the last two-digit number and add them to that two-digit number. The result we have in the example here is one inch and two hundred, thirty four thousandths.
Dial Caliper Tech Tips:
- Maintenance & Cleaning: Before use, gently but thoroughly remove oil, dust and dirt from the entire surface of the dial caliper, taking care not to damage the measuring or reference faces.
- Zero Point Confirmation: Before taking a measurement, clean and close the jaws and check that the dial needle points to "0" on the dial face.
- Dial Caliper Usage: Properly close the caliper on the workpiece. Do not allow dirt, chips, etc., to enter the rack. Otherwise, the rack and pinion could be damaged, which would result in reduced accuracy and improper zero adjustment.
- Caliper Storage: When not in use, properly store your caliper in an environment free of heat, dust, humidity, oil, and mist.
Want To Learn More about caliper measuring tools?

Download our valuable guide on the proper selection and usage of digital, dial, and Vernier calipers. Learn the advantages and disadvantages of each, and which caliper best meets your needs and suits your application. Find information on:
- The fundamentals of calipers
- The features and appropriate use of digital, dial and Vernier calipers
- The benefits of calibrated calipers
- Ingress Protection (IP) Ratings explained


