Check out this video and see Travers Tool Tech Team Expert Kurt Repsher demonstrate how to read outside micrometers. Outside micrometers are used for the accurate measuring of the thickness of an object or the outside diameter of a part. Be sure to subscribe to our YouTube Channel by clicking the button below, and check out many more exclusive 'How To' videos, product demos, unboxings and more!
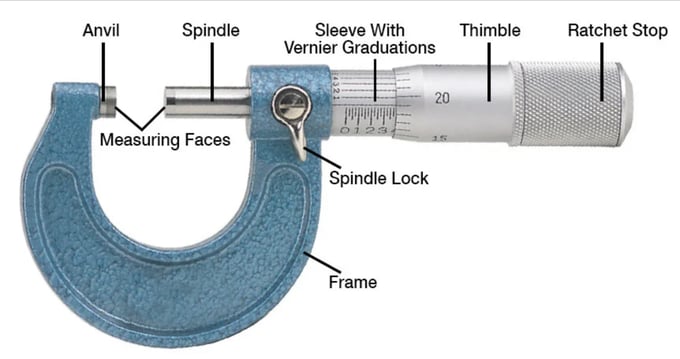
What Are The Parts Of An Outside micrometer?

The THREE Steps Of Measuring With A Micrometer:
- Clean the micrometer: Use soft cloth to wipe down the anvil and the spindle of the micrometer. Removing any dust or debris present on the measuring faces will ensure precise measurement.
- Begin to measure: Place the object you are measuring against the micrometer’s anvil. Tighten the device until the spindle is firmly pressed against the object. If you need to prevent your thimble from turning use the locking lever or wheel to secure it in place. You can also fasten the frame on a micrometer stand to free up both of your hands if so desired.
- Read the measurement: Follow the four step measuring process, noted in detail below.
DIFFERENT TYPES OF OUTSIDE MICROMETERS?
how do you read MICROMETERS?
Follow This Simple Four-Step Process to read MICROMETERs:

-
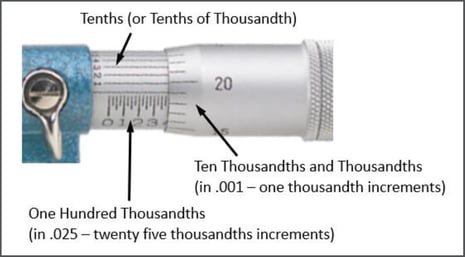
STEP 1: Read the sleeve measurement
-
STEP 2: Next, read the thimble measurement
-
STEP 3: Now read the vernier
The vernier will provide the ten-thousandths place of your decimal measurement. -
STEP 4: Finally, add it up!
Add step 2 to step 1 (add your thimble measurement to our sleeve measurement), and then just "tack" step 3 (your vernier measurement) onto the end. As an example, if you're measuring something that is 0.1234", you'd find the .100 on the sleeve (step 1), the .023 on the thimble (step 2), and then you'd add . 023 to .100 for a combined .123. Then, you'd find .0004 on the vernier scale and just tack that onto the end.
TECH TIP: Sometimes, for people who are learning this, when you have .123, and you see the .0004 on the vernier scale, it's easy to misunderstand, leave out a zero (.004), add it to .123 and get .127. It's easier to understand if you forget about the zeroes and just put the number from the vernier scale onto the fourth place (the ten-thousandths place), at the end of the .123, to obtain the correct measurement of .1234.
MICROMETER MAINTENANCE & Tech Tips:
- Maintenance & Cleaning: Before use, gently but thoroughly remove oil, dust and dirt from the entire surface of the micrometer, taking care not to damage the measuring faces. Clean the measuring faces with a clean cloth before and after taking any measurements.
- Calibrate When Necessary: When a micrometer is at its minimum reading, the horizontal line on the sleeve should line up with the ‘0’ on the thimble. If that is not the case, calibrate the micrometer by rotating the sleeve. Each micrometer comes with an adjusting wrench for this specific purpose. Verify the horizontal line on the sleeve lines up with the ‘0’ on the thimble before each use.
- Micrometer Storage: When not in use, properly store your micrometer in an environment free of heat, dust, humidity, oil, and mist. If you have electronic (digital) micrometers, remove the batteries if they'll be stored for a long period of time.
Want To Learn about calipers?

Download our valuable guide on the proper selection and usage of digital, dial, and Vernier calipers. Learn the advantages and disadvantages of each, and which caliper best meets your needs and suits your application. Find information on:
- The fundamentals of calipers
- The features and appropriate use of digital, dial and Vernier calipers
- The benefits of calibrated calipers
- Ingress Protection (IP) Ratings explained
Or to watch our How To Read A Dial Caliper Video, click here.


