Resident tech expert Kurt Repsher introduces and demonstrates the basics of using taps, dies, and creating threads in our latest video. Learn all the basics of threading and get tips on threading from the pros! Subscribe to our YouTube Channel to check out more application videos like this one!
What Is A Tap Used For?

How do you tHREAD a hole?
Tapping a hole is the process of creating threads on the interior of a drilled hole to enable screwing in a bolt or machine screw. Follow these steps as you approach a threading application:
1) Determine the correct size you'll need to drill for the bolt you are trying to screw in:
Your hole will be have to be smaller than the diameter of the bolt, because the threads you'll tap will increase the diameter. Use a tap & drill chart to match up the tap, or bolt, sizes with their corresponding clearance drill bit size. Drill the hole using the clearance drill size noted on the tap and drill chart.
2) Determine the tap you'll need to thread the hole you've drilled:
Refer again to the tap & drill chart to match up the tap size with their corresponding clearance drill bit size (the drill you just used to drill the hole).
3) Tap the hole:
To begin tapping, rotate the tap clockwise until you feel resistance from the threads cutting into the workpiece material. For every full rotation clockwise, make a half rotation counterclockwise, as this will break off any chips that have accumulated and will clear the space for the tap's cutting edges to keep cutting cleanly. This may not be as necessary if the hole was tapped with a spiral flute tap, or especially with spiral point taps.
4) Test the hole:
Once you've tapped the hole and while the tools you used are still readily available, you'll want to test it to be sure you're satisfied with the result. Prior to inserting the screw or bolt, be sure to remove chips from the hole (compressed air or chip retrievers can be used). Once the hole is cleared of chips, insert and screw in the bolt. If you encounter any resistance, or the bolt doesn't screw into the threaded hole cleanly, you can run the tap through the hole again if necessary, taking care to ensure the threads begin in the same place to avoid cross threading the hole. Any rough edges on the outside edge of the hole can be cleaned with a deburring tool, providing a smooth edge and a professional finish.
What Is A Die Used For?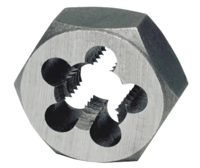
Dies are used to make external threads on a rod, creating a threaded surface that allows a bolt to be fastened to it. The die is applied to a specific diameter of rod for the size and pitch of the threads you want to cut. An external thread (screw thread), is cut by hand with a round die that is fixed in a die stock. Round dies have three or more cutting edges, and in-between each, there are cavities which remove the chips.
How do you create an external thread on a rod?
1) Clamp the round die into a die stock:
Place your round die into the center of the die stock (tighten the screws around the die with the flat-tip screwdriver). Make sure that the holes for the screw connection are in the correct position.
2) Thread the rod:
Align the round die with the edge of the rod and carefully turn the round die clockwise onto the rod while applying some pressure. Take your time and be sure you are cutting a straight thread.
3) Remove the die from the rod:
Once you have completed cutting the external thread, unscrew the round die in the opposite (counterclockwise) direction.
4) Test the thread:
Once you've threaded the rod and while the tools you used are still readily available, you'll want to test it to be sure you're satisfied with the result.
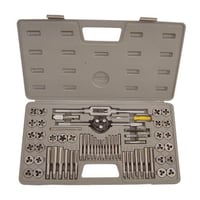
Tap & Die Sets
Invest in a tap and die set should you often perform threading applications. A tap and die set offers an array of compatibly sized taps and dies, and typically will include a tap handle and a die stock. Most sets include molded cases that keep the components securely in place and readily available for your use.
Tech Team Pro tipS:
- Pay attention to any unusual resistance you feel as you're tapping the hole, and when in doubt, back the tap out a few threads to avoid having chips bind within the hole. You can also use lubricant, like TapIt-All or Tap Magic, make tapping the hole easier.
- Having a lot of difficulty removing a screw? There's a good chance you need some heat! Using a torch and applying heat to the screw for a few moments often loosens and softens the hold thread locker that may have been applied to the screw has on it, allowing you to more easily back a screw out of a hole and remove it. See more tips on how to remove a broken screw here.
Want To Learn More About TAPPING It RIGHT?
 Download our comprehensive guide on different tap styles and learn how to best apply them to help you approach your tapping applications more efficiently than ever!
By downloading, you'll learn more about:
- How to choose the right hand tap for your application
- The differences between & pros and cons of tap styles
- Chip control
