
Check out our latest video, and learn power drill basics, how to use a power drill, and learn power tool tips from our resident tech expert Kurt Repsher. Subscribe to our channel to see more exclusive how to videos and tips from the pros.
Power Drill Anatomy
A review of standard drill features:
Each power drill includes a number of standard features. Refer to below for an overview of these features and familiarize yourself with the terminology to better your understanding of our video and of how to use a power drill.
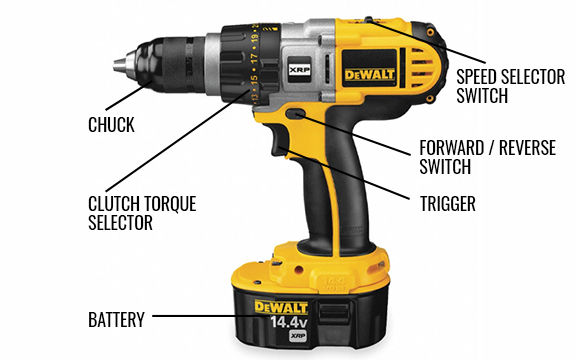
- Chuck: a chuck holds the drill bit in place within the drill. While some chucks require a key to tighten them and allow adjustment, most typically require you to simply twist them counterclockwise to open them and clockwise to close and tighten them around the drill bit.
- Clutch Torque Selector: This selector allows you to adjust the drill's torque, increasing or decreasing the torque depending on your application. When drilling into a material, in general, harder surfaces need more torque. If you are using a screwdriver bit to tighten a screw, decrease your torque to allow a more gentle fastening and lessen the risk of stripping the screw head.
-
Forward/Reverse Switch: This is a switch that allows you to change the direction of the drill bit’s rotation. To tighten screws or drill a hole, set the switch in the forward position by clicking it to the right, which will set your rotation in a clockwise motion. To remove a screw or extract the drill bit from a hole you just drilled, set the switch in a reverse motion by clicking it to the left, which will set your rotation in a counter-clockwise motion. If you set this switch in the center, it effectively turns your drill 'off', and doing so is recommended when the drill is not in use to avoid the drill chuck from moving should the trigger accidentally be activated when the drill is in transit. This can prevent an accident and can also prevent your drill from switching 'on' and draining your battery.
- Trigger: Squeeze this piece to operate the drill. Apply pressure with your finger to start the drill chuck's (and drill bit's) rotation. Release the trigger to stop the rotation.
- Speed Selector Switch: Variable speed drills are equipped with a speed selector switch that allows you to set the speed your application requires. Setting 1 is lowest speed, and the higher numbers indicate a higher speed. Lower speeds are best for driving screws, while higher speeds are best for drilling or driving fasteners. Pro tip: only change the speed of the drill when the drill is at a complete stop to avoid damaging the gearing.
-
Battery (or cord): This is your drill's power source. Only use a battery that is compatible with your cordless drill, and when possible, keep a charged 'spare' battery handy to avoid downtime should your battery loose its charge. When using a corded drill, use care as you would with any electric power tool and avoid water or excessive moisture to reduce risk of shock.
CHOOSE THE RIGHT Drill BIT FOR YOUR APPLICATION: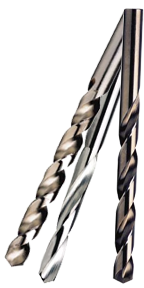
- High Speed Steel Drill Bits: these common and economical drill bits are ideal for hobbyists and general purpose applications, also suitable for short production runs.
- Cobalt Drill Bits: little harder than high speed steel, cobalt drill bits will last longer and are suitable for short to medium length production runs.
- Solid Carbide Drill Bits: solid carbide tools offer the hardness and durability that makes them ideal for long production runs. Solid carbide drill bits should be handled with care, as their hardness leaves them brittle and susceptible to breakage if they are not handled appropriately.
How To Change A Drill Bit:
Once you’ve chosen your drill bit, it’s time to insert it into your power drill. If you are removing a drill bit from the power drill to accommodate your new selection, remember that drill bit may be warm from friction if it was just in use – use care and safety gloves to prevent a burn or injury. Follow these steps:
- Disconnect the drill from the power source. Be sure the switch is set to 'off'.
- Open the chuck. Rotate it counterclockwise (or use chuck key if applicable) until you see the chuck open.
- Remove the previous drill bit or screwdriver bit from the chuck and safely store it.
- Insert the new bit into the chuck as far back as it can go. Make sure it’s centered within the chuck and not at an angle.
- Twist the chuck clockwise (or use chuck key if applicable) to tightly close it around the drill bit.
- Be sure your drill bit is firmly held. It should sit securely within the center of the drill chuck jaws and not wiggle.
How To use A Drill:
Before drilling holes into any material, remember the 'measure twice, cut once' rule applies here. This includes verifying the drill bit diameter correlates with the diameter of screws you are using. Once you are sure you have measured correctly, verified your drill bit diameter is correct, and have marked where your holes belong on your material's surface, be sure to put on safety glasses before you begin to drill.
To use a power drill to drill a hole, follow these steps:
- Power up your drill. Plug it in or insert a charged battery.
- Use the clutch torque adjustor to adjust the torque to better suit the material you’re drilling.
- Find the marks you made on the surface that identify where to drill.
- Get at the correct level to drill the hole, assuring the drill bit is perpendicular to the material's surface. If you require a ladder, be sure it’s opened and secured properly to prevent a fall or injury.
- Stabilize your drill vertically. You want the hole to be perfectly straight.
- Gently pull the trigger and start drilling with a low speed as you penetrate the material's surface. As you get further into the material, you can increase speed.
- Once you’ve drilled as far as you need, use the forward/reverse switch to put the drill in reverse.
- Pull the trigger and back out the drill bit. Take care not to pull the drill bit out at an angle, as this can damage the drilled hole and the drill bit itself.
To use a power drill for inserting a screw into a hole, follow these steps:
- Power up your drill. Plug it in or insert a charged battery.
- Use the clutch torque adjustor to adjust the torque so it's at a low setting. Drilling screws into pilot holes requires little force.
- Align the slots on the screw with your screwdriver bit.
- Align the screw with the hole.
- Make sure the drill is perpendicular with the material's surface.
- Gently pull the drill's trigger on the drill while gently pressing into the screw.
- Once the screw is inserted, stop drilling (to avoid stripping the screw head).
PRO TIP:
If you have concerns that your screws will loosen over time due to exposure to elements or vibration, consider use of threadlocker to ensure they will stay fastened and tight. Watch our How To Use Threadlocker video for more tips.
Want to learn more?
We believe the Right Tool Is Everything™, and we strive to share our experience and expertise in an effort to ensure you select the right tool for your application, follow best practices, and can push your productivity further.
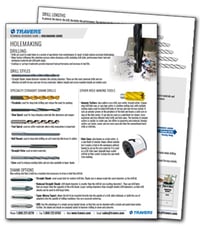 Download our Holemaking Guide by clicking below. By downloading, you'll learn about:
- Drill style, length and shank options and when to use them
- Choosing the right drill for your material with our drill selection chart
- Drill performance levels
- The benefits of coolant-fed drills
- Reamer types & when to use them
- Speed & feed recommendations for reamers
- Troubleshooting counterboring applications, and more!